So I hosted my first Thanksgiving in our tiny house last week. While it was hectic, it was also, fantastic! Nate and I own our double and my sister Erin rents out the other side. We split up the cooking duties and dined al fresco in the back yard. Nate and I wanted our house looking fabulous for my family so we did a couple of home improvement projects.
I've been saying I wanted to do this for awhile and I finally did it!
Looks adorable, no? It took FOREVER with me standing on a ladder to get that done. I did it all free hand, impressive, I know and I used my favorite paint, One Shot. This was by no means an easy project as One Shot is a very unforgiving paint but if you're feeling adventurous you could spruce up your facade the same way! And look at the fun shadow it casts on the inside of the house...
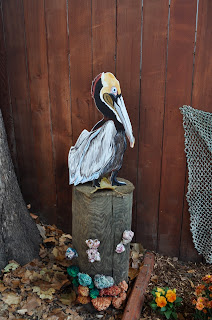
Nate's domain is the backyard and he loves doing art projects together. So we came up with this great lawn decoration...
Here's how you do it! First things first you're going to need a piece of wood. We used plywood which wasn't as great because it's thin pieces of wood glued together. If you can find a solid piece, power to you! You're going to want to draw your pelican on said piece of wood:
Next you'll need to get your handy boyfriendo or some one who feels comfortable using a jigsaw to cut her out!
Maybe you're wondering why Nate's fingers are blue. This is because we wanted to dye our pieces of coral fun colors. At first we tried clothing dye with not much success. Then we used tie dye and BAM colorful coral.
You'll also want a Gypsy dog to chew on your pieces of scrap wood as this brings her much joy. Then Nate will tell you she shouldn't be chewing on it because of the glue in the plywood and you'll have to take it away from her :(
The cutest! Anyway. So over the next couple of days you have to get your coral to stick to your pile on. By the way, the pile on is just something we found on the side of the road. We can't resist awesome trash. It was a hard process with the gluing of the coral so we got a thick coat of goo on the back then taped it while it dried.
Have you forgotten about our pelican friend? I haven't. You're going to want to make him or her look like more than just pelican shaped wood now. I used acrylic paint and then sealed it up with a spray lacquer. And it went from this...
TO THIS!!
And there you have it; wonderfully fun and unique decorations for making your house a home. Needless to say the fam was impressed and I am now exhausted from a long week of entertaining. Freret Market is this weekend and I've got a lot of work to do to finish up my inventory for the weekend! Wish me luck!

Monday, November 29, 2010
Thursday, November 11, 2010
Monday, November 8, 2010
Belly Painting!!
I was so excited when I got a call about doing a pregnant belly painting. For some reason, maybe it's the feeling huge and bloated, pregnant women don't often want to get their big ole' tummies painted. I got the call a couple of months ago when this woman was 6 months pregnant. Her husband is in the NFL but started his football career at the University of Florida. She wanted to get the Gator's logo on her tummy but not until she was about ready to pop and we would also have to wait until her husband was out of town. She's going to have a picture of her blown up as his Christmas present. Such a sweet surprise!
Here's a sneak peek. I didn't want to include her face yet in the off chance that it would ruin the surprise for her husband. I don't know why he would ever be looking at my blog but you know, just in case! I'll post full body shots after Christmas.
Here's a sneak peek. I didn't want to include her face yet in the off chance that it would ruin the surprise for her husband. I don't know why he would ever be looking at my blog but you know, just in case! I'll post full body shots after Christmas.
Speaking of husbands, my wedding website is up and running! Check it out!
shannonandnate.com
Freret Market - November
So last month was my first arts market and while I was kind of prepared I felt way better about everything this month. I've been working on some original water colors for my New Orleans alphabet and while I was only able to finish 18 of the 26 letters (I only had a month after all), I was able to get two banners together to be sold. I had "Give Thanks" and "Who Dat." I was hoping to also have "Merry Christmas," "Celebrate," and "Happy Birthday" but alas, it did not happen. Next month.
My stuff all packed up and ready to go. I got a great deal on some really nice frames through amazon and I even had "Art by Shannon" labeled bags.
My voodoo dolls have been selling really well! Nate didn't think they would but I have proved him wrong! I sold all but two. Dad and Kerry were in town for the weekend because Dad LOVES Freret Market and he also got to attend Friday Night Fights.
And of course my sisters and Nate were on hand to help too! I'll be out at both the markets for December. It's the 4th and the 11th. Hope to see you there :)
Thursday, November 4, 2010
Halloween - DIY Costuming and Body Paint
Halloween is my favorite time of the year! I love to dress up and in New Orleans, it's all about having a wildly creative costume. I'm fortunate in that I've been gifted with a knack for art but my costume this year wouldn't be too hard to reproduce. I was a Voodoo Priestess and Nate was my doll. Here we are in our full get up:
Things we made ourselves:
1) The Burlap Shirt: All of this stuff is pretty easy to do because the more primitive it looks, the better! I went to Joanne's Fabrics and picked up two yards of burlap, some black yarn, and crafting needles. I was not feeling to hot the week before Halloween, so Nate actually did the stitching himself. We cut out two pieces to look like and over sized t-shirt and just stitched up the sides.
2) Pins: For the pins we cut some knitting needles down and stuck styrofoam balls on the top and then simply painted them black. Add some glue between the needles and the balls so they don't slip off. Nate got them to stay by adding a little foam under his shirt where he stuck the needles. Then we put some stage blood around the holes because we like to look scary.
You can see both a bit better in this photo. We did a heart where the heart should be because we thought it added a little more interest to the shirt:
3) The Head Purse: This was super easy and SUPER AWESOME. I bought a severed head, with the chains already attached, from the Spirit Halloween Super Center. Nate did all the hard work for me by cutting the head open, pulling out some foam, adding a cardboard bottom and then sewing a zipper to the top. Voila! A super creepy accessory and perfect prop to carry all your crap around in!
4) Rat Necklace: You can see it pretty well in the picture above this and all you have to do to make it is buy a bag of mice or rats from whatever costume store you shop at, use a heavy duty craft needle, and string 'em together. I added lots of face blood to mine.
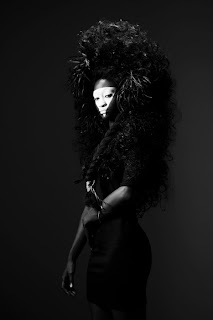
I also painted a leotard to look tribal but the show stopper is the wig. I got it for payment when I did make up for this photoshoot. Fifi Mahoney's styled it and it was much heavier than I thought it would be but totally worth it to wear all night.
Now, just for fun, some of the face and body painting I did this Halloween season:
I'll be selling at Freret Market this Saturday. Come say hi if you're there!
Subscribe to:
Comments (Atom)


